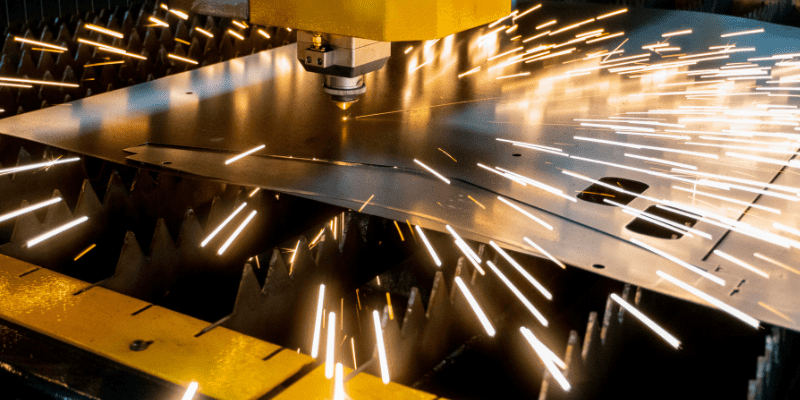
There is no doubt that laser-cutting technology has revolutionized manufacturing, making it possible to quickly and easily create high-quality products. While laser cutting is a hugely beneficial technology, there are some ways to improve the quality of your laser cuts. Here are 20 tips to help you get the most out of your laser cutter.
How to Improve Laser Cutting Quality?
A laser cutter is an efficient machine designed for maximum accuracy and high quality. However, several factors can lower the rate of a laser cut. But with the right approach, you can drastically improve your laser cutting quality and produce a top-notch cut.
So without further ado, let’s look at 20 tips to help you improve the laser cutting quality:
1. High Laser Power
One of the easiest ways to improve the laser cutting quality is to use high laser power. If the material is thick and the laser power is not strong enough, it will cause striations in the final cut. The problem is these striations are usually visible even to the naked eye and can dramatically reduce the final quality.
So, to ensure that such striations don’t appear when cutting thick materials, check the laser power of your machine.
Generally, machines come with an already preinstalled laser beam. So, if possible, we recommend upgrading the laser beam on your machine to a higher power. If your machine allows adjusting the power of the laser beam, you can increase it for a better cut.
However, if your laser cutter is already set to high power, the only option is to upgrade to a better one.
You can easily cut through thick metal sheets with high laser power without compromising the edge quality. For example, you will need a higher laser power for cutting stainless steel than wood.
In short, the laser beam power depends on the required cutting thickness of the material. Low laser power can lead to a poor cutting edge or even failure to make any cut. So the first thing you should check for a high-quality cutting edge is the laser power!
2. Correct Laser Technology
In the day, laser cutting technology wasn’t so advanced, but new and better technologies have emerged over the years.
For example, laser cutting machines equipped with a fiber laser offer fast cutting speeds when compared with C02 laser cutters. However, fiber lasers are not recommended if the sheet is thicker than 8mm. Using fiber lasers in thick sheets can degrade the quality of the finished cut.
That’s why it is important to use the correct laser technology according to the material used.
3. Better Material Quality
You may buy an expensive laser cutter, but it will still produce lower-quality cuts if the material used is sub-standard.
Expensive technology doesn’t always equal high-quality production. In this context, your materials are as important as your technology.
So, to get a better edge quality and a smooth finish, ensure that the material you use is high-quality.
For example, if you use a steel sheet, make sure it is rust-free, pickled, clean, and even oil-free! And while checking the physical conditions of the steel, make sure that it is high-grade steel.
Generally, low-grade steel contains a higher portion of impurities which can interfere with the cutting process. The finished quality can deteriorate even further if low-grade steel is used with an oxygen-assisted laser cutter.
So, use the highest quality material with a smooth and even finish. Considering the popularity of laser cutters over the years, many companies have started offering laser-grade materials suitable for laser-cutting machines.
4. Improve Laser Cutting Speed
The laser power density and cutting speed are directly proportional to each other. Similarly, the density and thickness of the material are inversely proportional to the cutting speed.
So by improving the laser cutting machine speed, the quality of the final cut can be improved. Some of the things you can do to increase the laser cutting speed include:
- Increase the power within the specified range.
- Use low initial evaporation energy for materials such as plexiglass, plastic, etc.
- Reduce the focused size spot by using a lens of short focal length.
- Cut thin materials based on the power of your laser cutting machine.
- If possible, switch to using low-density materials.
5. Focal Position
Another important factor for maintaining the cutting quality is the position of the workpiece surface and the focal point. Normally, the focal position is slightly below the material surface or right next to the surface during the cutting process.
When cutting the material, ensure that the relative position of the workpiece and the focus remain constant – This will help you get a better quality cut from the laser cutting machine.
Generally, the ideal distance between the workpiece surface and the nozzle is around 1.5mm. However, it can change depending on the material used, machine type, etc.
When the laser beam is focused with a short focal length, it leads to high power density and small spot size. These conditions are ideal for cutting thin material quickly and with superior cut quality.
On the other hand, using a lens of wider focal depth is more suitable for cutting thick material.
6. Accurate Laser Cutting File
The laser-cutting file contains detailed instructions for the laser-cutting machine. After reading the information in the laser cutting file, the machine makes the desired engraving or cuts.
So, an easy & straightforward method to improve the quality is to ensure accurate calculations in the laser-cutting file. If the calculations are off by even 1cm or a few millimeters, it can affect the finished quality of the cuts!
The cut must be further refined and sanded down if it is made a little larger. This can ultimately deteriorate the final cut quality.
7. Use Vector File Format
If you want to maintain quality, only use the vector files in your laser cutter. Normally, image files such as jpg or png are made of pixels. Therefore, when they’re resized, they can lose their quality. And you can imagine what would happen if the same pixel-based image is used in the laser cutting machine. It will lead to poor edge quality and may even lead to an incorrect or wrong cut!
So to prevent any quality loss, always ensure that the laser cutting is done in a vector file format.
Various tools can help you create and edit vector files for your laser cutter. This includes Adobe Illustrator, CorelDraw, Affinity Designer, and so on.
8. Correct Software
Correct software can also affect the quality of laser engraving or laser cutting. If you plan to make banners or logos, then you’re better off with 2D software. In general, 2D software is used when working with flat objects.
But if your project requires a 3D shape, it will be practical to use 3D software.
Some of the popular 2D software are given below:
- Adobe Illustrator
- Inkscape
- AutoCAD
- CorelDRAW
Now, here are some of the popular 3D software.
- Autodesk Fusion
- Autodesk Inventor
- Solidworks
- FreeCAD
Some of these mentioned tools are free, and some are paid. But when it comes to their functionality, there is very little difference.
Moreover, to maintain the quality of your cuts and engravings, we recommend working with software that you’re proficient at. So if you are good with particular software, stick with it and avoid using a new tool – unless necessary, of course!
Normally, you can make really good designs and accurate measurements if you are accustomed to the software. But if it’s new software, it can lead to incorrect measurements, which ultimately affects the quality of the laser cuts!
9. Correct Thickness
Although it is important to choose the correct material, it is equally important to pick the correct thickness too!
A normal laser beam can easily cut materials ranging from 1mm to 10 mm. So if you plan to do engraving, you need to pick material of sufficient thickness. Furthermore, a material that is too thin will melt away upon making contact with the laser beam.
In contrast, picking a higher-thickness material may cause the machine problems in the cutting process. As a result, it can lead to poor-quality cuts.
10. Add Kurf in Calculations
During laser cutting, the laser also evaporates a small amount of the material, creating a gap. This basic definition of the kerf is present in several other cutting mechanisms.
Normally, kerf width isn’t a problem. But if you are designing assemblies and want to fit one piece with another, you need to be wary of kerf width! That’s why you shouldn’t neglect the kerf in your calculations. This will help maintain the highest quality throughout the process of laser cutting.
11. Distance Between Cutting Lines
The distance between the cutting lines is also important among the many factors dictating the cutting quality. Usually, you shouldn’t leave too big of a distance between two or more cutting lines. Similarly, leaving too little distance between cutting lines can cause the material to melt or even cause a fire.
So to ensure that the cutting quality is maintained, try to keep a fair distance between the cutting lines.
Normally the problem usually arises when the distance between the cutting lines is too narrow. This causes the material to melt and can even break the material due to additional stress from the laser beam.
Unfortunately, no guideline specifies what should be the ideal distance between the cutting lines. This means you have to rely on the guidelines of your laser-cutting machine or guidelines provided by the material supplier.
12. Add Nodes
One of the benefits of using laser-cutting technology is that it allows one to create assemblies. As mentioned earlier, you need to consider the kerf when making assemblies with the help of laser cutting.
But another factor that needs to be incorporated into your design is the nodes. If you plan to join the cut parts of a material like puzzles, you should add nodes.
Now you may ask, what are nodes? These are small bumps intentionally left to improve friction between pieces and reduce the stress level of the structure!
On the contrary, adding sharp edges to parts to be connected later on is not a good idea at all. Especially if sharp edges are added to the corners, this can lead to weak points, which can endanger the structural integrity of the parts!
Another trick to improve the design and the quality is to add holes near the edges instead of straight & sharp edges.
When laser-cutting materials, this may seem like a minor thing. You may even think about how it will affect the quality of the laser cut. But after you are done with cutting and connecting different parts, it will lead to better structural integrity and improved designs!
13. Convert Text to Path
Text plays an important role in laser engraving and even laser cutting by enhancing the appearance of your finished product. However, many new users of the laser-cutting process often miss one tiny detail.
Here’s the thing with text and laser cutting. A laser cutter can not read the text unless it is converted into a path. So loading your laser-cutting file into the machine without converting text into a path leads to poor cutting quality. And it may miss the engraving/cutting of the text altogether!
So another tip to improve the cutting quality is to convert text to path in your software. The exact procedure to perform this will differ from one software to another. However, you can easily find online tutorials for any popular software.
For example, a short YouTube video illustrates how you can convert text to a path using Adobe Illustrator. Similarly, you can also find online tutorials for all the other software on YouTube.
14. Skilled Operator
You can buy the best laser cutting machine available in the market. But if the operator is not skilled, you will suffer from quality problems! For example, an experienced operator knows all the correct laser cutting parameters. More importantly, he knows how to optimize the laser cutting machine.
If you want to use the machine by yourself and do not want to hire an operator. Then you will need to become skillful! These days, you can easily find a lot of online tutorials on how to use different types of laser-cutting machines.
So, practice with smaller projects before working on a big project to get acquainted with how the machine works!
This will improve cut quality and help you figure out the correct laser-cutting parameters for your machine.
15. Add Vector Score
If you have already adjusted the focus and lens, it will automatically give you good edge quality. But if you want to improve the edge quality further, you should use a vector score on the edge of your cuts.
And the only way to utilize the vector score is by having your laser-cutting file in the vector format.
To add a vector score, open up your image in the vector software of your choice and add a stroke to the edge.
16. Use a Good Laser-Cutting Machine
If none of the above-mentioned tricks are working and you are still left with poor quality, maybe it is time to change your laser-cutting device for good!
If you look at the market, you will notice that laser-cutting devices come with different price tags (both high and low). In general, low-cost laser-cutting machines are not good at engraving and only work with limited materials. In contrast, an excellent laser-cutting machine works with many different materials, leading to precise and high-quality cuts.
17. Check Piercing Quality
In high-speed laser cutting, the laser head punches a small hole in the material’s surface. Only after punching a small hole the machine continues its cutting movement.
This small hole made by the laser head is called piercing. It can help you ensure the highest edge and cut quality in laser cutting.
So once this piercing is made, take a moment to look for any abnormal noises, sparks, or a large gap – All of these points towards incorrect laser cutting parameters and should be corrected before starting the process again.
This will help you maintain the edge and grant the highest cut quality!
18. Check Kerf Size
Earlier, we discussed how the kerf should be considered in your calculations. However, the kerf size can also determine whether you will have a smooth and high-quality cut or not.
At the start, try to make a test cut and observe the kerf size.
A too-big kerf size indicates that your laser power is set at a high setting. Similarly, it suggests that your cutting speed is slower than it should be. As a result, this leads to a lot of molten material.
So if you notice a lot of molten material or a big kerf size, you should adjust the cutting speed and the laser power settings.
19. Use Pure Auxiliary Gas
The auxiliary gas blows away the waste material (slag) to help the laser beam cut efficiently. Without the auxiliary gas, the slag will accumulate at the material’s surface. In return, it leads to poor or even no cutting.
This means using pure auxiliary gas is important to achieve high-quality and accurate cuts. That’s why you should ensure that the auxiliary gas used in your machine is 99.5% pure (minimum).
Furthermore, using the right auxiliary gas with the material used is equally important. Normally, oxygen gas is used for working with carbon steel, mild steel, and tool steel. Similarly, nitrogen gas is preferred for cutting steel (stainless, mild, and galvanized). As for cutting and engraving aluminum, the air is used as an auxiliary gas.
In short, different gases are used for different materials, and using the right one is very important!
20. Use Correct Nozzles
The nozzle controls the auxiliary gas’s injection area in a laser-cutting machine. This directly affects the laser-cutting quality. So, the nozzle’s height, size, and structure are equally important to producing quality cuts and engravings.
A partially damaged nozzle can cause uneven airflow and affect the auxiliary gas flow on the material. So, the first thing is to ensure that your nozzles are in good shape and not damaged.
Another thing to remember is to use the right nozzle diameters for cutting different thicknesses. For example, a Φ1.2 nozzle is suitable for stainless steel plates of 1-6mm thickness. And a Φ2.0 nozzle is useful for stainless steel plates around 6-10mm thick. Basically, as the thickness increases, the nozzle’s size also increases!
Also, ensure that the nozzle is coaxial with the laser beam to maintain good quality in the cutting process. Another factor to check is the distance between the workpiece and the nozzle. That’s because it also affects the quality of the cutting!
FAQs
Let’s look at some of the frequently asked questions:
How do you prevent burn marks on a laser cutter?
You can take several steps to prevent burn marks when using a laser cutter:
- Change the cutting speed to lower settings.
- If you are working with wood, use mineral spirit for cleaning before cutting.
- Set the PTPPs or the frequency on the machine.
- Increase the laser power of the machine.
What are the limitations of laser cutting?
Although these are highly sufficient machines, they also have some limitations. This includes costs, hazardous fumes, the need for an expert operator, and a limited thickness size of the material.
But despite these limitations, laser cutters are still regarded as one of the most efficient solutions for high-speed engraving and cutting.
Which auxiliary gas is used for cutting wood or plastic?
Normally, you can cut or engrave wood or plastic without auxiliary gas. But for a thick piece of wood or plastic, compressed air is normally used as an auxiliary gas.
Conclusion
As you can see, a lot goes into ensuring that your laser cutter produces the best quality engravings and cuts. Although our list of 20 tips may seem extensive, following every single one will help you solve all the problems related to quality, slow speed, or poor edge quality!


